Introduction
While trying to resurrect a G602 I had laying around, I finally resorted to reflowing the PCB of the 500Hz receiver module. To my surprise that solved the issue!
Parts
-
-
To disassemble to receiver, grip both ends of the receiver with pliers then pull to separate.
-
-
-
Remove the PCB from the receiver plastics and ensure there is no residual plastic remaining on the PCB.
-
Solder flux may be applied at this stage to help with the reflow process.
-
-
-
Place the PCB in a temperature resistant tray/container. The PCB will be heated to ~500 degrees Fahrenheit, ensure the container can withstand this level of heat.
-
-
-
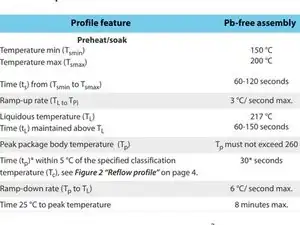
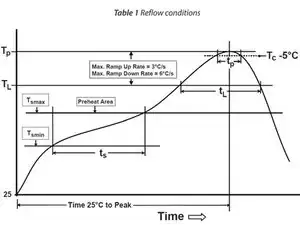
Reflow according to the attached information following as closely as possible to avoid damage. Use a thermometer to track your progress if using a standard heat gun. Make sure not to exceed the maximum temperature and apply even heating to the PCB.
-
Note: When reflowing if too much heat is applied to the edges of the PCB the PCB can begin to delaminate.
-
Note: Reflow profile follows Nordic Semiconductors guidelines. Nordic Semiconductor is the manufacturer of the SoC Transceiver used in this device.
-
Optional: If using a reflow oven set profile according to the attached documents.
-
Optional: This can be performed in a standard kitchen oven, though this is not recommended unless the PCB is sealed in an airtight container to prevent potentially toxic gasses from escaping and depositing inside the oven.
-
-
-
Allow the PCB to cool and reassemble the device.
-
Once the device is cooled and assembled, test your connection to the receiver using the Logitech receiver connection utility.
-
To reassemble your device, follow these instructions in reverse order.
