Introduction
This is a quick video of how to replace the battery and some of the challenges you will see, what tools you will need, and how easy it is to change it. I made a mistake that you can avoid.
Tools
-
-
separate rubber case from back of earpiece. you don't need to remove it completely like I did.
-
-
-
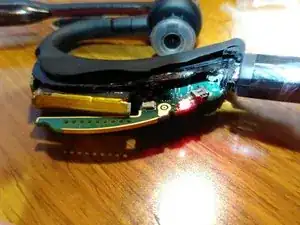
you will need to slowly cut through the foam to separate the wires from the battery. then use a soldering iron to desolder the old battery from the board these connections go through the entire board.
-
-
-
solder the new battery in and test the charging before reassembly.
-
the new battery I ordered was slightly larger but it fit with no problems. I found the wires inside this device to be fairly robust and did not have any issues with wires breaking or dislodging.
-
-
-
When I re-assembled I used small amounts of gorilla glue for both the case and the rubber cover. it worked very well and has worked well since. for more details I put together a short video you can check out.
-


To reassemble your device, follow these instructions in reverse order.
2 comments
I accomplished this battery replacement. I was successful. However in my opinion, this device was not meant to have this repair done. It is a “fiddley” affair, but possible. I think it took me two hours, at my leisure. Probably better off replacing the device. Unless…. your just that type who enjoys fiddling around.
I have 2 of these type headsets that I bought as refurbs. They both lasted less than a year...cheap batteries I'm thinking. The process from Dan looks to be a moderate repair. I am going to give it a go because I like to fix things and will write back if I complete the process!
Richard -